


Arduino 10k热敏电阻(NTC)测温
来源:本站 更新时间:2016-12-26 08:40:14 查看次数:
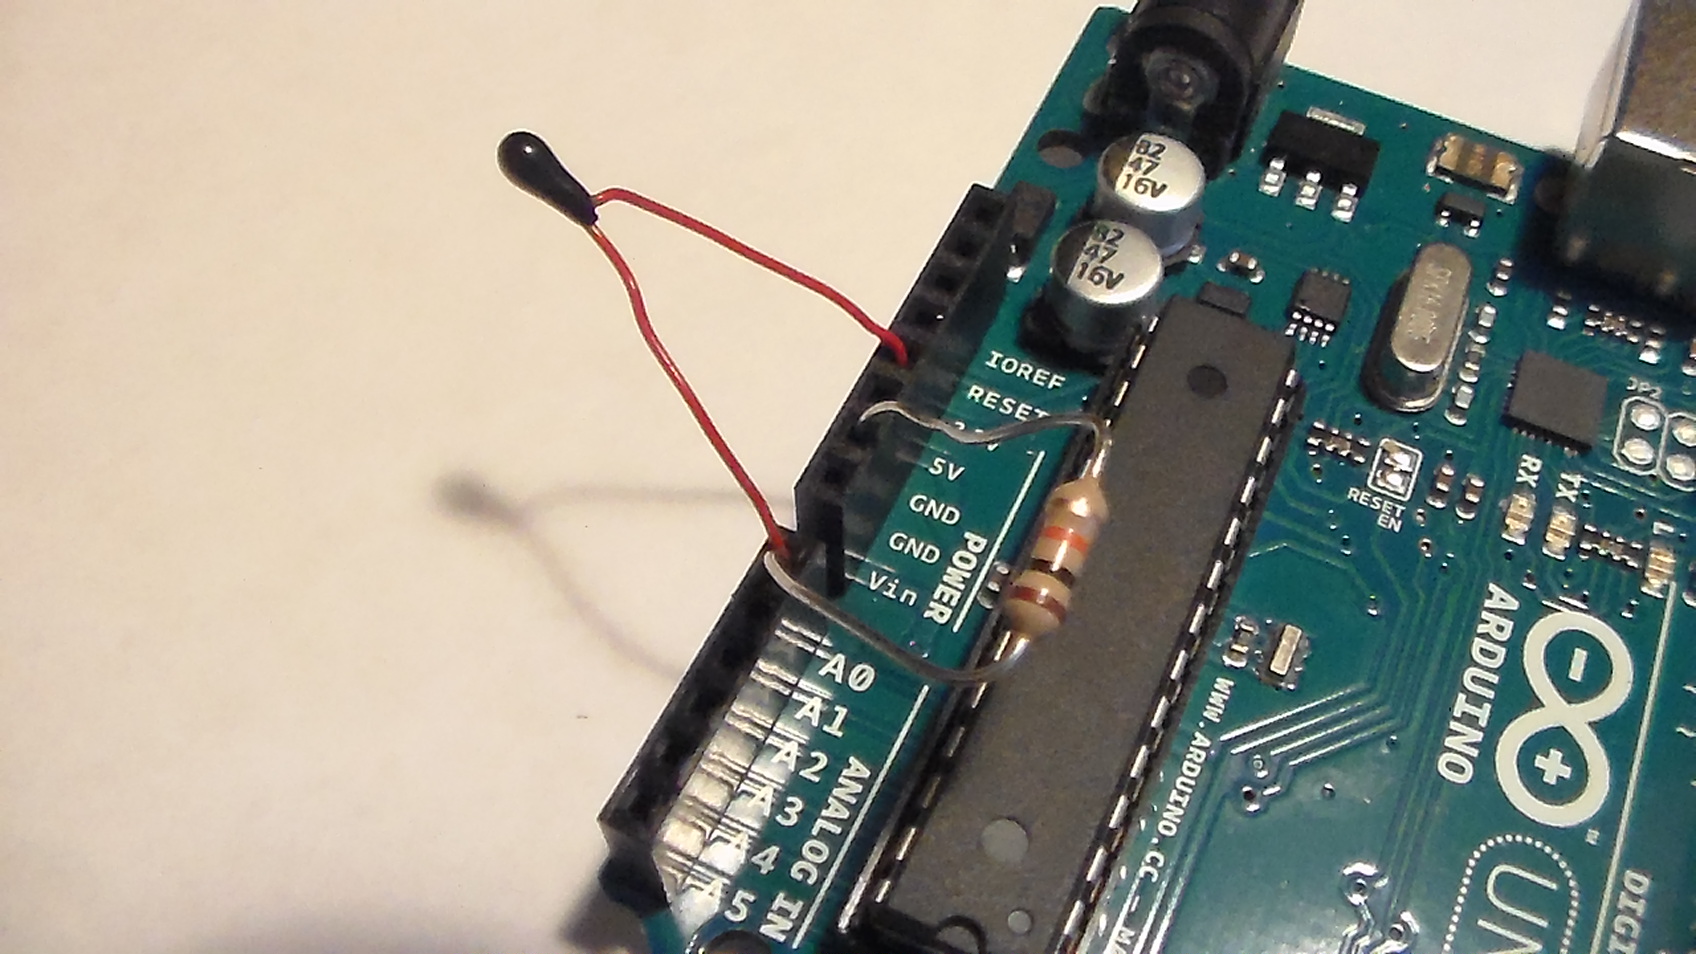
用Arduino10K热敏电阻NTC的电阻测量,需要找出如何实际测量电阻与Arduino将这信息到β方程,可以使用一个电压分压器来做,用专业NTC热敏电阻生产厂家富温传感10K±1%NTC作为温度传感器来测温,采用Arduino没有现成的例子用NTC测温的,FWQBX-103K3435系列温度传感器,这款传感器能够测量-30-120摄氏度的温度,NTC热敏电阻根据温度变化产生电阻阻值变化,而且是非线性的变化,这就需要用上拉电阻或下拉电阻来选择分辨率较好的区间。
Arduino的代码:
Arduino的代码:
/*
================================================================================

    File........... Thermistor_Demo_Code
    Purpose........ Thermistor demonstration code
    Author......... Joseph Corleto
    E-mail......... corleto.joseph@gmail.com
    Started........ 7/25/2016
    Finished....... 7/25/2016
    Updated........ --/--/----

================================================================================
   Notes
================================================================================

================================================================================
  Updates
================================================================================
*/

//===============================================================================
//  Header Files
//===============================================================================

//===============================================================================
//  Constants
//===============================================================================
//Thermistor related:

/* Here we have a few constants that make editing the code easier. I will go
   through them one by one.

   A reading from the ADC might give one value at one sample and then a little
   different the next time around. To eliminate noisy readings, we can sample
   the ADC pin a few times and then average the samples to get something more
   solid. This constant is utilized in the readThermistor function.
   */
const int    SAMPLE_NUMBER      = 10;

/* In order to use the Beta equation, we must know our other resistor
   within our resistor divider. If you are using something with large tolerance,
   like at 5% or even 1%, measure it and place your result here in ohms. */
const double BALANCE_RESISTOR   = 9710.0;

// This helps calculate the thermistor's resistance (check article for details).
const double MAX_ADC            = 1023.0;

/* This is thermistor dependent and it should be in the datasheet, or refer to the
   article for how to calculate it using the Beta equation.
   I had to do this, but I would try to get a thermistor with a known
   beta if you want to avoid empirical calculations. */
const double BETA               = 3974.0;

/* This is also needed for the conversion equation as "typical" room temperature
   is needed as an input. */
const double ROOM_TEMP          = 298.15;   // room temperature in Kelvin

/* Thermistors will have a typical resistance at room temperature so write this
   down here. Again, needed for conversion equations. */
const double RESISTOR_ROOM_TEMP = 10000.0;

//===============================================================================
//  Variables
//===============================================================================
// Here is where we will save the current temperature
double currentTemperature = 0;

//===============================================================================
//  Pin Declarations
//===============================================================================
//Inputs:
int thermistorPin = 0;  // Where the ADC samples the resistor divider's output

//Outputs:

//===============================================================================
//  Initialization
//===============================================================================
void setup()
{
  // Set the port speed for serial window messages
  Serial.begin(9600);
}

//===============================================================================
//  Main
//===============================================================================
void loop()
{
  /* The main loop is pretty simple, it prints what the temperature is in the
     serial window. The heart of the program is within the readThermistor
     function. */
  currentTemperature = readThermistor();
  delay(3000);

  /* Here is how you can act upon a temperature that is too hot,
  too cold or just right. */
  if (currentTemperature > 21.0 && currentTemperature < 24.0)
  {
    Serial.print("It is ");
    Serial.print(currentTemperature);
    Serial.println("C. Ahhh, very nice temperature.");
  }
  else if (currentTemperature >= 24.0)
  {
    Serial.print("It is ");
    Serial.print(currentTemperature);
    Serial.println("C. I feel like a hot tamale!");
  }
  else
  {
    Serial.print("It is ");
    Serial.print(currentTemperature);
    Serial.println("C. Brrrrrr, it's COLD!");
  }
}

//===============================================================================
//  Functions
//===============================================================================
/////////////////////////////
////// readThermistor ///////
/////////////////////////////
/*
This function reads the analog pin as shown below. Converts voltage signal
to a digital representation with analog to digital conversion. However, this is
done multiple times so that we can average it to eliminate measurement errors.
This averaged number is then used to calculate the resistance of the thermistor.
After this, the resistance is used to calculate the temperature of the
thermistor. Finally, the temperature is converted to celsius. Please refer to
the allaboutcircuits.com article for the specifics and general theory of this
process.

Quick Schematic in case you are too lazy to look at the site :P

          (Ground) ----\/\/\/-------|-------\/\/\/---- V_supply
                     R_balance      |     R_thermistor
                                    |
                               Analog Pin
*/

double readThermistor()
{
  // variables that live in this function
  double rThermistor = 0;            // Holds thermistor resistance value
  double tKelvin     = 0;            // Holds calculated temperature
  double tCelsius    = 0;            // Hold temperature in celsius
  double adcAverage  = 0;            // Holds the average voltage measurement
  int    adcSamples[SAMPLE_NUMBER];  // Array to hold each voltage measurement

  /* Calculate thermistor's average resistance:
     As mentioned in the top of the code, we will sample the ADC pin a few times
     to get a bunch of samples. A slight delay is added to properly have the
     analogRead function sample properly */

  for (int i = 0; i < SAMPLE_NUMBER; i++)
  {
    adcSamples[i] = analogRead(thermistorPin);  // read from pin and store
    delay(10);        // wait 10 milliseconds
  }

  /* Then, we will simply average all of those samples up for a "stiffer"
     measurement. */
  for (int i = 0; i < SAMPLE_NUMBER; i++)
  {
    adcAverage += adcSamples[i];      // add all samples up . . .
  }
  adcAverage /= SAMPLE_NUMBER;        // . . . average it w/ divide

  /* Here we calculate the thermistor’s resistance using the equation
     discussed in the article. */
  rThermistor = BALANCE_RESISTOR * ( (MAX_ADC / adcAverage) - 1);

  /* Here is where the Beta equation is used, but it is different
     from what the article describes. Don't worry! It has been rearranged
     algebraically to give a "better" looking formula. I encourage you
     to try to manipulate the equation from the article yourself to get
     better at algebra. And if not, just use what is shown here and take it
     for granted or input the formula directly from the article, exactly
     as it is shown. Either way will work! */
  tKelvin = (BETA * ROOM_TEMP) /
            (BETA + (ROOM_TEMP * log(rThermistor / RESISTOR_ROOM_TEMP)));

  /* I will use the units of Celsius to indicate temperature. I did this
     just so I can see the typical room temperature, which is 25 degrees
     Celsius, when I first try the program out. I prefer Fahrenheit, but
     I leave it up to you to either change this function, or create
     another function which converts between the two units. */
  tCelsius = tKelvin - 273.15;  // convert kelvin to celsius

  return tCelsius;    // Return the temperature in Celsius
}
富温NTC产品介绍:
NTC温度传感器电阻值(25℃)=10K B常数(25/85℃)(标准值)=3435
FM51-10K/3435NTC温度传感器电阻温度系数可(2~5)%/℃
温度升高电阻值降低NTC熱敏電阻10K/3435 生产厂家
温度检测NTC热敏电阻阻值为10K B值热敏系数3435 价格优势
温度补偿NTC热敏电阻25℃ 下的零功率电阻值10KΩ FUWEN
恒流调光电源用NTC热敏电阻常温10K B值3435 导线500MM
防浪涌场合应用MF51-100K/3950NTC高精度热敏芯片 FUWEN
阻值10K B值3435AT系列--非绝缘引线型高精度NTC探头
快速反应 防水性好 性价比高NTC热敏电阻MF53-10K3435总长90MM
NTC热敏电阻MF51-104F3950L45MM耗散系数:0.3mW/℃ (在静止空气中)
可在高温和高湿等恶劣环境下使用玻封NTC热敏电阻器10K/3435 FUWEN
小体积热敏电阻(NTC芯片)阻值10KΩ±5% B值3435K FUWEN
环氧水滴封装NTC温度探头10K/3435 PVC电线(并线)导线50MM
10K/3435NTC温度传感器PVC线UL2651 28AWG 105℃ 300V 50mm
年漂移率小于1PPM一致性好10K/3435NTC温度传感器 FUWEN
Arduino 10k热敏电阻(NTC)测温廉价的热敏电阻测量温度的简单方法.。有几种方法可以改善设置:
将一个小电容与输出电压并联。这将稳定电压,甚至可能消除需要平均许多样品(如在代码)-或者至少你可以平均少样本。
使用精密电阻(优于1%)有更一致和可预测的测量。如果您需要绝对临界温度测量,请记住,热敏电阻的自加热可以影响测量;该项目不补偿自加热。
当然,103K±1%NTC热敏电阻是一个传感器用于温度测量。另一个流行的选择是使用一个温度芯片这样一个(PDF)。这样就不需要处理线性化或复杂的方程。另外两种选择是热电偶和红外传感器,后者可以测量温度没有实际接触,但他们并不便宜。
使用精密电阻(优于1%)有更一致和可预测的测量。如果您需要绝对临界温度测量,请记住,热敏电阻的自加热可以影响测量;该项目不补偿自加热。
当然,103K±1%NTC热敏电阻是一个传感器用于温度测量。另一个流行的选择是使用一个温度芯片这样一个(PDF)。这样就不需要处理线性化或复杂的方程。另外两种选择是热电偶和红外传感器,后者可以测量温度没有实际接触,但他们并不便宜。
上一篇:NTC热敏电阻电阻温度系数 下一篇:B值3435K 阻值10KΩ NTC热敏电阻器

